Tuesday, June 25, 2013

'Merica!!

You can never go wrong with a good American flag design. Esp. since Fourth of July is coming up soon.

My toes I painted the big toe blue and the others red. I used a striping brush to do white stripes on the red toes and a dotting tool to do the "stars" on the big toes.

As for my fingers; I painted them all white. I sponged red, white, and blue stripes on each nail. Then I added some star glitter to each nail.


Instagram: Chrystine14

Coral and glitter

This is just a plain neon nail design. All nails are painted with a neon coral and the ring finger nail is painted with a silver glitter. I loved this mani for summer!

Instagram: Chrystine14

Hot pink Chevron

This is a hot pink and glitter chevron design. The middle finger is black a white chevron and ring finger is sliver glitter.

Instagram: Chrystine14

Blue and silver zebra

All nails but my pointer and ring finger were painted blue. The other two were painted silver. On the silver nails I painted blue zebra stripes.

Instagram: Chrystine14

Purple Mani Pedi match

This was done with a dark purple and a neon pink. On the toes I painted my second toe pink and the other purple. The big toe had the design on it.

As for my fingers I painted all of them with purple tips and a pink line underneath. But the ring finger still just a tip I added the same design to it as on the big toes.


Neon zebra/cheetah

With this I painted all my nails white first. Then I sponged on a set of three colors on each nail but the ring finger. (Coral, Neon yellow, Neon Pink). The ring finger I painted a Caribbean blue glitter. On the sponged nails I took black and painted cheetah spots and zebra stripes. Added some glitter.

Instagram: Chrystine14

Neon tips and black matte

This is exactly what the title says. The tips of each nail are a different color. Bright blue, neon pink, neon yellow, neon purple, and coral. The rest of the nail is painted black then a matte (chalk board) top coat is added just to the black. Making the neon stand out more.


Instagram: Chrystine14

Blue chevron

Chevron has become a very popular pattern this year. Like when the animal print came out. This was my first set of chevron nails. So the lines are not perfect. The blue is called "Tiffany" Blue. Also adding the sparkly accent nail. I also did this in a gel manicure, top coat. So they lasted for quite a while.


Instagram: Chrystine14


Tribal nails

I always thought the tribal look was really cool. And it seems to be the "in" thing this year. So this was my first attempt at it. Its an ok design. It could look better. I also did something different and did this design in gel manicure. That could be partly why mine turned out differently than expected.


Instagram: Chrystine14

Cracked Easter Egg

This is a very simple design and cute. The bright colors are always great. I painted the nails white. Added different stripes of colors in different ways on the nails. (Like a rainbow). Then I took white crackle and painted on top. At first I thought it was just cute. But it was Easter time so I called it a cracked egg.

Instagram: Chrystine14

Neon magenta butterflies

This is a pretty simple design. Just about how you draw your black lines to make the butterfly wing. Just draw a diagonal curve near the cuticle, add some lines going up to the tip. Connect them with a half circle. Color the tip black. Add white dots. And there's your wing.

Instagram: Chrystine14

Water Marble

Water marble nails are always really cute, but to get them it can be a pain. Sometimes I have the problem of getting the nail polish to actually drip and spread in the water like it should. You just have to use fresh polish.

This one I used white, neon pink, and coral. Then finished them with some glitter top coat.


Instagram:Chrystine14

Tuesday, March 5, 2013

Flower Power


Yes it is still Winter time, but I felt like doing something happy and bright.

Gel Mani.
I used a coral/peach color polish.
Some flower nail stickers.
And some 3D nail flowers.

* The stickers were put on my ring and middle finger. But they were still different, the ring finger was completely covered, and the middle finger was just the tip.
* And I placed two 3D flowers on my thumbs, I tried to correspond the colors with the colors in the stickers.
* I went over everything with the gel top coat which hardens and will help everything stay in place longer.
* The 3D flowers I used a regular top coat as if it were glue and then sealed everything with the gel top coat to ensure they would not fall off.


"I wanna see your Peacock!"


I have this fascination with peacock feathers. I think they are so beautiful. I can pencil draw a feather all day long, but when it came to trying to paint one on my nails I could not. So this is something I plan on working on for the future.

But for this I used so nail stickers of peacock feathers.

There are two different views to this design. The first was done with Caviar beads, but once they fell off I did something different to replace wear the beads had been.


Champagne Party

The reason why this is called Champagne party is because of the accent ring finger. That is the color of that nail. The rest is a black with gold glitter. I got a lot of compliments on this simple design that was just some dark colors placed together. I really like it for an everyday wear. It goes with everything, for going to school or for a date. It sports any event, and this lasted.

Again this is another gel manicure.


Ruby Red Slippers

This was just another simple gel manicure. I've been doing a lot of them since I got the kit for Christmas.

They have become very quick and easy to do now. And they last for a long time and still look great till you take them off.

This was a simple bright red polish with red glitter top coat.

I done this on my mom for "Wizard of Oz."
She had said that the gel manicure has made her weak fingernails a lot stronger and are less likely to break.


21st Birthday Nail Celebration!!

~ So this was the nail design that I had done up for my 21st birthday.

~ Pink, Black, Glitter, and Zebra. My favorite things! <3

~ This  is also a gel manicure.

* I first did the gel mani with pink glitter on all my nails.
* Then painted a white tip on all of them.
* Next did black zebra strips on the tips.
* Lastly Finished the gel mani.


Saturday, February 23, 2013

ZTA

These are some Zeta Tau Alpha inspired nails I did up for my sorority's recruitment week. The first set was done with Caviar beads, but once the beads fell off I replaced them with white zebra strips. But the whole mani is done in Gel.


First Gel Nails

This was my first try at Gel mani. I got it as a Christmas present. So this will also be my review of Gel polish.

~When I first did this it took me forever. I was just learning. Now when I do them it takes maybe 10mins or less depending on if I do designs or not.
~ I love the fact that when you do these they are dry and you are ready to go.
~ But when you do them make sure you have nothing to do and have plenty of free time, cause if you pick things up while doing them, air or fuzz sticks very easily to them till youre finished and you can not get the fuzz off, leaving your nails a little rough feeling when theyre done.

~ It takes 30secs for the base coat
~ 60secs for the color to cure
~ And 30secs again for the top coat.
~ Once you are doe you take this solution to clean them and get the stickiness off so no fuzz sticks them.

~ You do need to be careful not to get any on your skin around your nails, when the polish is cured and hardens and will take a while to fade off.

~ The directions and other reviews I have read about Gel mani have said it will last 2weeks. I have
found that mine lasted a lot longer.

~ I have read some things saying this is unhealthy for you and will cause damage to your cuticles. The only damage is if you don't know what youre doing when go to do it and take the polish off. If it was that harmful to your health it would have been taken off the market already.
~ I love this polish! Its easy, quick, fun, and long lasting!


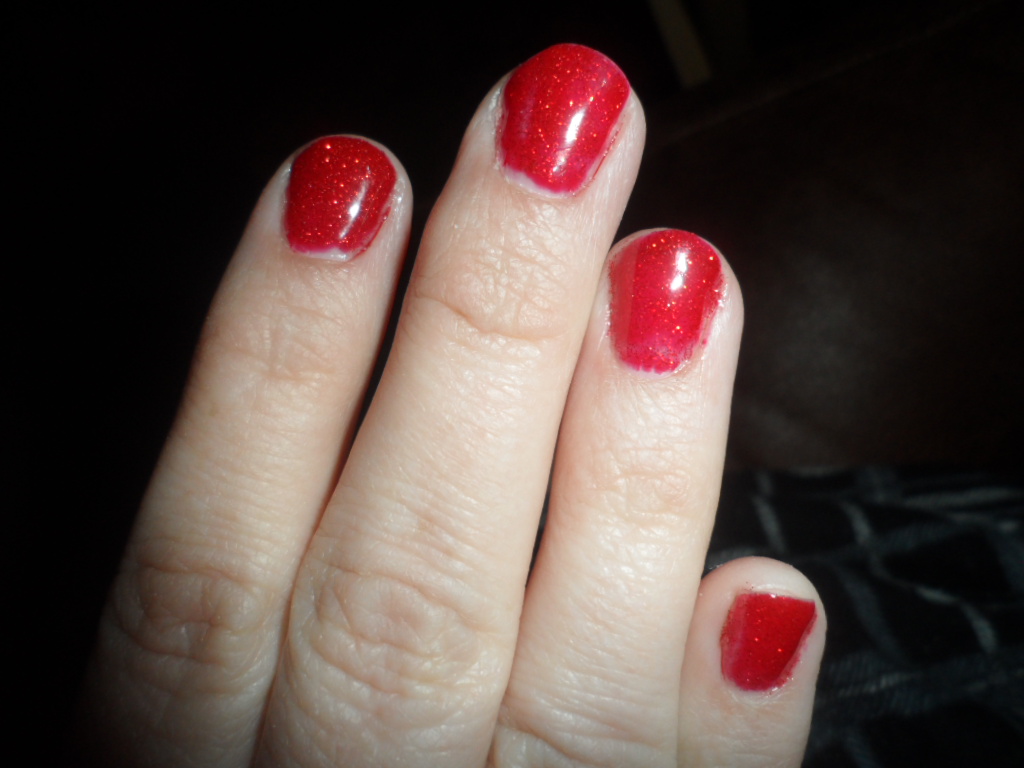
~ The pictures I am posting lasted for 3 maybe 3 and half weeks. I posted the end result of them before I took them off to show how well they still looked. My thumb did start to peel off, and you can see how far my nails had grown at the cuticles where there is no polish.