Tuesday, December 11, 2012

1st try at Caviar Nails

So I have been wanting to try the new "Caviar" nails since they came out. I was unsure how well they would actually work, being beads on yours nails. I figured they would get caught on everything and fall off. So I finally broke down and bought the mini kit at Sephoras. The kit was $28 and they have a bigger one is $80ish. Its by the company "Ciate" which also have a regular nail polish line at Sephoras.
The mini caviar kit came with 4polish colors and 4 different kinds of pearls, and a small funnel.


Since this was my first time trying this, this is going to be a review blog as well as showing you what they look like and how to.

  • I didn't do every nail like it shows in some of the pictures. I did my ring finger and my thumb.
    • The ring finger is a good nail to put the pearls on. The thumb not so much. With picking things up and such the thumb nail did scrap or get caught on things. So those did not last as long.
  • It also says to only put topcoat on the tips of the nails to seal in the beads on the edge. I read before that if you put it all over the nail it will wash the color away. It didn't wash the color away on the tips for me. But after a few days the color had worn off on the beads. I believe the main reason the color coming off cause I kept rubbing my nails and looking at them since they were new. But the tips with topcoat on them kept their original color. So its up to you, you can experiment with the topcoat if you want.
  • I read about this product online before actually buying it. It says that it will last about 2-3days.
  • By just putting them on two nails they lasted quite a bit. I had done them on a Thursday afternoon and the pearls hadn't really fallen off till late Sunday night. I think they would've lasted maybe at least one more day, but when quite a few fell off and I started picking at them.
  • I feel like they are cute and are perfect for certain events. (Since they don't last long). But the polish line by "Ciate" does last a long time. It is a very good polish but since its a Sephoras its a little pricey.
 - A tip that I found online on some other nail blogs. Was that they used the craft brand "Recollections" microbeads to pour onto the nails instead. So you can use any kind of nail polish and go to a craft store purchase the crafting beads and do your nails for a whole lot cheaper. The beads are around $3-4. And they are the same size as the caviar beads. And more of selection of colors.


Now time for the pictures and how to:
  • First I painted all the nails with the pink shade; the first polish in the picture. Let dry and do your second coat.
  • On the nails that you're going to put the pearls on do that second coat last when you're ready to pour the pearls on.
  • The lid that is in the kit is to be used as a tray for the pearls when your pour them. Don't becareful with them, just pour them all over the wet polish.
  • Gently press the pearls on your nail to make sure they are in place, and on the edges of the nails.
  • The directions it comes with says to let dry for 15-20mins. This may seem long but being my first try I did what it said.
  • Once dry it says to add topcoat on the tips like I talked about above in the review.
Sorry for this post being soo longg. But I wanted to give a review on this manicure. Its becoming very popular. Look forward to doing it more :)


Brown on Brown Cheetah

This is your typical brown cheetah design. Its a nice simple and elegant design. And the brown is always good for fall.


~ First I painted all the nails a dark brown. (My brown is from the "Hunger Games" collection by China Glaze.

~ Then I placed some random light brown spots on all the nails. The dots can be any size and shape. (The light brown I used is also from the "Hunger Games" Collection by China Glaze.)

~ For this you can either use a dotting tool or an art brush. But I then outlined the dots in black.


~ The next step is something extra I did. I used a (Matte) topcoat on the nails. Which took away the shine but still looked cute. Compare the top images to the bottom ones to see the difference. (Note: the camera flash did still add a shine to it. Matte polish is supposed to be kinda dull, if one black makes it look like chalkboard.)


Purple Party Tips

This is a fairly simple nail design and looks very cute. Kinda made me think of a party nail design or something for new years eve. They also lasted a long time. Tips are not hard for me to do free handed, also at the time my nails were quite long so it was a lot easier to do the tips.

* I first painted a base coat on the nails.
* Next I used a purple to paint the tips only. Except for my ring fingers I painted the entire nail purple.
* Once all the purple dried, I went over the purple parts only with a glitter polish; that had black, blue, and purple glitter in it. I did a few coats once they dried to make sure there was enough glitter to my liking.
* Then I outlined the tips with black to seal the tips and make it look even.
* And finally added top coat :)


Saturday, October 20, 2012

Fall Strips

This design is very simple to do. And I feel looks great. I thought that it kinda fits in with fall colors. It is black and gold.


Things I used was something new I found was a black polish with gold glitter in it. I've only ever seen black with silver. Thats why I was so happy at this find.lol. And I used a light gold nail art design.


- I painted every nail with the black glitter polish. Usually used about 2-3coats to make sure the nail is dark and covered.


- Once this dried, using the gold nail art I painted zebra strips along the tips/top half of each nail only. Kinda like I did a zebra strip french tip.

- Completed by top coat like always to seal the deal and give it a gloss.

- It did not take long at all and I love the colors. Only doing the zebra strips on the top makes it different than normally how one would see the strips done.

- Love this for fall, so hope they last long :)

Think Pink (mom's nails)

This is my second set of Think Pink nails. October is Breast Cancer Awareness month in honor we wear PINK!!!

These nails are my mom's. Done with pink ribbons and cheetah print.


* First I painted all of her nails light pink.
* Then added some hot pink strips on the sides of each nail (which is hard to see in the pictures)
* Next I painted some hot pink dots on all of the nails but the thumb and ring fingers.
* On the thumbs and ring fingers I painted hot pink ribbons. Then outlined them in silver to make them stand out more.
* Next I used black to outline the pink dots and make the cheetah look.
* And there you have your Think Pink Cheetah! <3


Think Pink (my nails)


I have done two different sets of Think Pink nails for this month. The first was on my-self and the second being my mom's nails. (which will be done up in a separate post)

For those of that might not understand what I mean by Think Pink; The month of October is Breast Cancer Awareness month. So in honor of that people go to races, do fundraisers, and WEAR PINK!!!

- With my nails only did I do Think Pink nails in honor of Breast Cancer but did two nails in honor of my sorority Zeta Tau Alpha whose philanthropy is Breast Cancer Education and Awareness.

* First off I painted all my nails expect my middle and ring fingers pink. I painted the other two with a light blue.

* Then I painted a diagonal line across the blue nails with silver and painted one half of the diagonal silver.

* Once everything dried I cheated and used stickers this time instead of doing everything by hand. I had some jeweled pink ribbon stickers that I placed on each nail that was pink. And had some ZTA nail stickers as well that I placed on the blue and silver nails.

* After placing the stickers I placed white polka dots on the pink nails around the ribbons.

* Finished with top coat adn was ready to go support Breast Cancer! <3


Tiffany blue and Gold glitter

This nail polish is actually called "Tiffany Blue" Its very pretty. And the glitter just a simple gold glitter polish.
Its a simple design. I did it on my toes.

- First painted all my toe nails with the "Tiffany Blue"
- That them dry.
- Painted over all the toes but the big toes with the gold glitter as if it were a top coat.
- Then on the big toes I did diagonal lines and just had half the toe just blue and the other half glitter.
- And of course sealed everything with a top coat and you're done.
- Pretty Tiffany Blue and Gold Glitter toes to show off :)


Friday, September 28, 2012

Matte Black

Matte is something I like to call the chalkboard look. To me it looks like a black chalkboard.
For this design I did both the toes and finger nails. I used a black polish, a matte top coat, and a black nail art.

~ First painted everything solid black.
~ Painted over everything with the matte polish. (dried and looked like chalkboard)
~ Then used the black nail art and painted zebra stripes on all the nails.

* This left a chalkboard background with glossy zebra stripes on top :)
* Black on Black.
* Matchy, Matchy :))


 Matte Top Coat

Candy Corn!!


I know its a little early for Halloween, but I think this is super cute, and felt it was kinda in between Fall and Halloween :)

This design is super cute! I've seen where people online have done candy corn colored nails before, but I have not seen this exact design before. This was something I thought of.

* First I painted all the nails white, and the ring finger and thumb I painted black. And on the black nails I painted over them with some matte top coat.


* Next I painted on the black nails small white triangles.


* I then filled in the white triangles with the colors of a candy corn in the correct order. Also on the white nails I did candy corn stripes.


Red & Black Half Moon

This was just the normal half moon but done in red and matte black. (Matte black is something I like to call chalkboard). I used red polish, black polish, and matte top coat. I only used the matte top coat on the black parts of the nail, leaving the read glossy.

*I painted all the nails solid red. Let dry completely.
* Then used some of the paper hole stickers and covered up a portion of the nail.
* Then painted the rest to the tip with black. Let dry and paint over the black with the matte top coat.


Pretty in Pink

This was a new twist on something I had seen on Pintrest. What I had saw was where all the nails were a shade of light pink, expect the ring finger nails they were painted a glitter sliver.

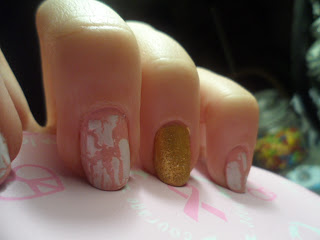
But what I have done was painted all my nails with a light pink shade expect the ring fingers. I painted the ring fingers with a pretty gold and went over them with some gold glitter polish to add more sparkle like I love to do. I then painted all the pink nails with some white crackle. And that's it! :) Its cute and simple.


Saturday, August 11, 2012

*Out of this world*

I got the idea to these Galaxy nails from Google images. This is the original picture I got the idea from:
The picture was from a person's blog called "Flaunt Me."

*And this is my step by step on how I did it myself :)

*You can use any colors for this that you want to these are just the ones I used. It might seem like a lot and this design might seem long and hard. But it really isn't. Its quite simple and doesn't take long. Its one of those that it doesn't have to be perfect.

* First I painted every nail with a glitter black and let dry. (This will be the only long part about it is to let the base color dry first).


 *Next I sponged on some white polish onto each nail. In different designs.


*Then I sponged on some yellow among the white and a little bit of orange in the middle of the lines.


*Next I outlined the lines with a shiny blue. Still using the sponge. (Any kind of makeup sponge will work for all this).


*I added just a bit of pink to some of the nails.
*Placed a few white dots along the nails to represent stars.
*Went over each nail with some clear glitter polish to give it more sparkle. (My idea)
*And another thing that was my idea was to add some glow in the dark polish to finish it off. That way in the dark or at night the galaxy and stars still glow and sparkle :)

(The light and flash of the camera kinda took away the look of the glitter polish but you sure see it in person).


*I tried my hardest to take a picture of them glowing but even the orange light on the camera messed it up. But you can kinda see it.